Key Takeaways:
- Excel's cell protection requires navigating multiple menus, understanding locked vs. unlocked states, and complex permission settings that confuse many users
- Excelmatic eliminates the technical complexity by allowing you to protect cells using simple language commands like "lock all formula cells"
- Compared to manual methods, Excelmatic automatically handles complex scenarios like user-specific permissions and formula protection without multi-step processes
- For professionals creating templates, sharing reports, or collaborating on budgets, the AI approach delivers perfectly protected sheets in seconds with zero configuration
When sharing a spreadsheet, we often want to ensure certain parts don’t get changed by mistake. Locking cells in Excel is a crucial skill for protecting sensitive data, preserving complex formulas, and maintaining the structural integrity of your worksheet.
While tools like Freeze Panes (which keeps parts of your sheet visible) or Data Validation (which controls data entry) are useful, cell protection is about preventing edits altogether. The traditional way to do this involves navigating through several menus and dialog boxes. But what if you could achieve the same result with a single sentence?
In this article, we'll walk you through the classic, step-by-step method for locking cells and introduce a more modern, AI-powered approach that gets the job done in a fraction of the time.
How to Lock All Cells in Excel
The Traditional Method
By default, all cells in an Excel sheet are set to a "Locked" state, but this setting only takes effect after you enable sheet protection.
To confirm this, press Ctrl + A or click the triangle button at the top-left corner to select the entire sheet. Right-click any cell, choose Format Cells (or press Ctrl + 1), and navigate to the Protection tab. You should see the Locked box is checked.
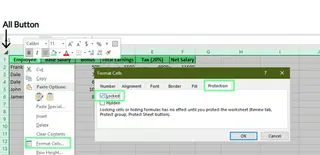
Checking locked cells. Image by Author.
Now, to activate the protection, go to the Review tab and click Protect Sheet. You can set an optional password (you'll be asked to enter it twice). Be warned: if you forget this password, there's no built-in recovery option.
In the dialog box, you can specify which actions users are still allowed to perform, such as selecting cells or formatting rows. Once you've made your selections, click OK. The entire sheet is now protected.
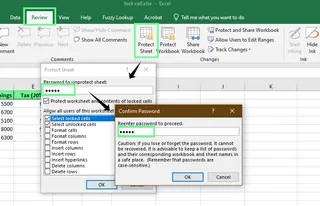
Protect the sheet with a password. Image by Author.
The AI-Powered Method with Excelmatic

The manual process is effective but involves multiple steps. With an AI tool like Excelmatic, you can do it with one simple command.
- Upload your Excel file to Excelmatic.
- In the chat interface, type your request in plain language.
For example, just say:
Protect this entire sheet.
If you need a password, it's just as easy:
Protect the sheet with the password
Report2025.
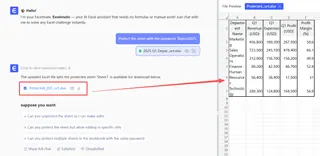
Excelmatic interprets your command and handles all the necessary steps—selecting, formatting, and protecting—in the background. It's a faster, more intuitive way to secure your data.
How to Lock Specific Cells
Let's say you're creating a template and want users to fill in certain cells while keeping others, like headers or key inputs, locked.
The Traditional Method
This process is the reverse of the one above. First, you must unlock all cells.
- Select the entire sheet (
Ctrl + A), right-click, and go to Format Cells > Protection. - Uncheck the Locked box and click OK. Now, no cells will be locked when you protect the sheet.

Unlocking all cells. Image by Author
Next, select only the cells you want to lock (in this example, E2:E6). Go back to the Protection tab in Format Cells, but this time, check the Locked box and click OK.
Finally, go to Review > Protect Sheet to apply the protection. Now, users can edit any cell except for the specific range you designated.

Specific cells locked. Image by Author
The AI-Powered Method with Excelmatic
Why go through the hassle of unlocking everything just to re-lock a few cells? With Excelmatic, you state your goal directly.
After uploading your file, simply type:
Lock cells E2 through E6 and protect the sheet.
Excelmatic understands the intent and executes the multi-step "unlock all, lock specific, then protect" workflow for you, saving you time and clicks.
How to Lock Formula Cells
When you share a spreadsheet for data entry, it's a great practice to lock the cells containing formulas. This prevents users from accidentally deleting or breaking your calculations.
The Traditional Method
- First, unlock all cells on the sheet (as described in the previous section).
- Go to the Home tab, click Find & Select in the Editing group, and choose Go To Special... (or press
Ctrl + Gthen click Special...). - In the Go To Special window, select Formulas and click OK. This automatically selects all cells containing formulas.
- With the formula cells selected, open Format Cells (
Ctrl + 1), go to the Protection tab, and check the Locked box. You can also check the Hidden box if you don't want users to see the formulas in the formula bar. - Finally, go to Review > Protect Sheet to enable the protection.
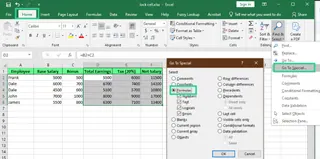
Lock the formula cells. Image by Author.
The AI-Powered Method with Excelmatic
The "Go To Special" feature is powerful but not very intuitive. Excelmatic makes this task incredibly simple.
Just tell it what you want:
Lock and hide all formula cells in this sheet, then protect it.
The AI automatically identifies all formula cells and applies the correct protection settings in a single step.
How to Unlock Ranges for Specific Users
For collaborative work, you might need different people to edit different parts of the same sheet. Excel's "Allow Users to Edit Ranges" feature handles this, but it can be cumbersome.
The Traditional Method
Imagine the marketing team needs to input expenses (A2:C6) and the finance team needs to approve totals (D2:D16).
1. Access the Feature
Go to the Review tab and click Allow Users to Edit Ranges.
2. Set Up the Marketing Range
- In the pop-up box, click New.
- Give the range a Title (e.g.,
MarketingInput). - In Refers to cells, enter
=A2:C6. - Set a Range password (e.g.,
mkt123), click OK, and confirm it.
3. Set Up the Finance Range
- Click New again.
- Title it
FinanceApproval, set Refers to cells to=D2:D16, and use a different password (e.g.,fin456).
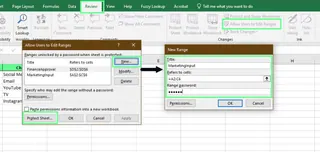
Lock specific ranges using the Allow Users to Edit Range option. Image by Author.
You can also assign permissions to specific users instead of using passwords. In the New Range window, click Permissions..., add users by their username or email, and grant them access. This avoids the need for team members to remember multiple passwords.

Permit specific rage without a password. Image by Author.
After setting up all ranges, click Protect Sheet to finalize the setup.
The AI-Powered Method with Excelmatic
The "Allow Users to Edit Ranges" dialog is powerful but notoriously complex. Excelmatic turns this convoluted process into a straightforward conversation.
Upload your file and describe the permissions you need:
Allow the marketing team to edit cells A2:C6 with the password
mkt123. Allow the finance team to edit cells D2:D16 with the passwordfin456. Protect the rest of the sheet.
Or, for user-based permissions:
Give
[email protected]edit access to range A2:C6 and[email protected]edit access to D2:D16. Protect everything else.
Excelmatic manages the complex backend configuration, delivering a perfectly protected sheet without the headache.
What Sheet Protection Settings Can Control
When you protect a sheet, the "Allow all users of this worksheet to:" list gives you granular control over what remains possible.

Protect sheet settings. Image by Author.
Here’s a quick summary of what these options do:
| Option | What It Allows |
|---|---|
| Select locked cells | Users can click on protected cells to view them (and see formulas if not hidden). |
| Select unlocked cells | Users can click and type in cells that aren't locked. |
| Format cells | Users can change font, color, borders, etc. |
| Format columns/rows | Users can change column width or row height. |
| Insert columns/rows | Users can add new columns or rows. |
| Insert hyperlinks | Users can add hyperlinks to cells. |
| Delete columns/rows | Users can remove entire columns or rows. |
| Sort | Users can sort data in unlocked ranges. |
| Use AutoFilter | Users can filter data using dropdown arrows. |
| Use PivotTable & PivotChart | Users can interact with existing PivotTables. |
| Edit objects | Users can change shapes, charts, or images. |
| Edit scenarios | Users can change values in saved what-if analysis scenarios. |
Common Mistakes and Tips
- Protection isn't encryption: Sheet protection prevents accidental edits, but it doesn't secure confidential data. Someone with the right tools (like a VBA script) can bypass it. Avoid storing highly sensitive information in shared, password-protected sheets.
- Don't forget your password: Excel has no "forgot password" feature for sheet protection. Store your password somewhere safe, or you may be permanently locked out of making changes.
- Unlock input cells first: A common mistake is protecting a sheet without first unlocking the cells where users need to enter data. Always double-check that input fields are unlocked before you apply protection. An AI tool like Excelmatic can help avoid this, as it understands the intent to "lock everything except these cells."
When to Use Alternatives
Locking cells is for preventing edits. For other goals, different tools might be better:
- Freeze Panes in Excel: Use this to keep header rows or columns visible as you scroll through a large dataset. It doesn't protect data, it improves navigation.
- Data Validation: Use this to control what users can enter into a cell (e.g., only dates, numbers from 1-10, or items from a dropdown list). It guides input and prevents typos.
Final Thoughts
Locking cells is a fundamental Excel skill for creating robust and reliable spreadsheets. The traditional, manual method gives you full control and is important to understand.
However, as AI continues to integrate with our daily tools, solutions like Excelmatic are revolutionizing efficiency. By replacing complex, multi-step processes with simple, natural language commands, they not only save time but also make powerful features more accessible to everyone.
Ready to simplify your Excel protection workflow? Try Excelmatic today and experience the ease of securing your data with simple language commands.
Whether you prefer the hands-on approach or the speed of AI, mastering cell protection will help you keep your spreadsheets clear, accurate, and easy to use.
Excel FAQs
What happens if I copy and paste protected cells into a new sheet?
The cell content and formatting will be copied, but protection settings won’t transfer unless the new sheet is also protected.
How do I highlight locked cells in Excel?
To highlight locked cells, use Conditional Formatting:
- Select the range you want to check.
- Go to Home > Conditional Formatting > New Rule.
- Select Use a formula to determine which cells to format.
- Enter
=CELL("protect", A1)=1(replace A1 with the first cell of your selected range). - Click Format, choose a fill color, and press OK.
Note: The sheet must be unprotected for this formatting rule to apply correctly.
How do I protect an entire Excel file?
To encrypt the whole workbook:
- Go to File > Info.
- Click the Protect Workbook drop-down and select Encrypt with Password.
- Enter a password, click OK, and re-enter it to confirm.


