Every spreadsheet warrior knows the power of simple Yes/No fields. Whether you’re tracking project approvals, inventory checks, or survey responses, these binary options keep data clean and actionable. Here’s how to implement them like a spreadsheet ninja—plus how Excelmatic (our AI-powered sidekick) can automate the entire process.
Method 1: Dropdown Lists with Data Validation (The Classic Move)
No more typos like "Yess" or "Nah." Data validation forces users to pick from predefined options:
- Select your target cells.
- Click Data → Data Validation.
- Under Allow, choose List.
- Type
Yes,Noin the Source box (no spaces!).
Now you’ve got a tidy dropdown menu. But why stop there?
Method 2: Conditional Formatting (For Visual Learners)
Make Yes/No answers pop with color coding:
- Select your Yes/No cells.
- Go to Home → Conditional Formatting → New Rule.
- Set rules like:
- If cell = "Yes", fill it green.
- If cell = "No", turn it red.
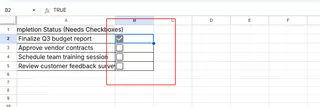
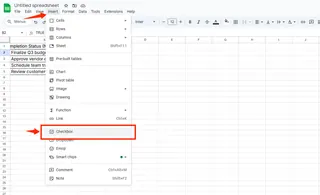
Method 3: Checkboxes (The Click-Happy Solution)
For maximum user-friendliness, insert checkboxes:
- Enable the Developer tab (File → Options → Customize Ribbon).
- Click Insert → Checkbox.
- Link each checkbox to a cell (Right-click → Format Control → Cell Link).
Checked = "TRUE" (Yes), unchecked = "FALSE" (No).
Level Up: Dynamic Dashboards with Yes/No Data
Turn those simple answers into insights:
- Use COUNTIF to tally responses:
=COUNTIF(A2:A10,"Yes"). - Build pivot charts to visualize approval rates.


