As a growth manager at Excelmatic, I’ve seen countless professionals struggle with date calculations in Excel—whether for forecasting, project deadlines, or financial reporting. While Excel offers manual solutions, modern teams need faster, error-proof methods. Here’s a breakdown of the most effective techniques, including how Excelmatic’s AI-driven tools streamline the process.
Why Date Calculations Matter in Business
Dates are the backbone of project planning, contract management, and financial modeling. But manually adjusting dates—especially when accounting for varying month lengths—is tedious and prone to errors. Understanding Excel’s date logic is the first step toward efficiency.
How Excel Handles Dates
Excel treats dates as serial numbers (e.g., January 1, 1900 = 1). This lets you perform arithmetic, but adding months isn’t as simple as adding days. For example:
- Adding days:
January 1, 2023+30=January 31, 2023. - Adding months: Requires functions like
EDATEorDATEto account for month-end variations.
Method 1: The EDATE Function (Simplest Solution)
EDATE is Excel’s dedicated tool for adding months. The syntax:
=EDATE(start_date, months)
Example: To add 3 months to March 15, 2023:
=EDATE("3/15/2023", 3)
Result: June 15, 2023.
Why It Works:
- Automatically adjusts for month lengths (e.g., January 31 → April 30).
- Handles leap years.
Pro Tip: For recurring tasks, Excelmatic’s AI engine can auto-generate and apply these formulas across datasets, saving hours of manual work.
Method 2: The DATE Function (Flexible for Complex Formulas)
For granular control, use DATE to construct dates from year, month, and day components:
=DATE(YEAR(A1), MONTH(A1) + 3, DAY(A1))
Example: If A1 = March 15, 2023, the result is June 15, 2023.
Edge Case Handling:
To avoid errors with month-end dates (e.g., January 31 → April 30), add a conditional check:
=IF(DAY(A1+1)=1, EOMONTH(A1,3), DATE(YEAR(A1), MONTH(A1)+3, DAY(A1)))
Method 3: Automate with Excelmatic’s AI Tools

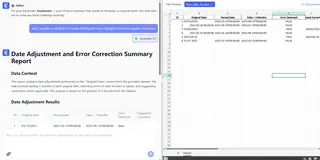
While manual formulas work, Excelmatic eliminates the guesswork by:
- Smart Date Recognition: Detects date formats and suggests adjustments.
- Bulk Processing: Adds 3 months to entire columns with one click.
- Error Alerts: Flags inconsistencies (e.g., invalid leap-year dates).
Try it: Upload your spreadsheet to Excelmatic, and use the prompt:
“Add 3 months to all dates in Column B (Original Date). Highlight errors and suggest corrections.”

Pro Tips for Business Users
Use Fill Handle for Series:
- Enter
=EDATE(A1,3)in cell B1. - Drag the fill handle down to apply to all dates.
- Enter
Combine with NETWORKDAYS:
Calculate business days between dates (excludes weekends/holidays):=NETWORKDAYS(start_date, EDATE(start_date,3))Visualize Timelines:
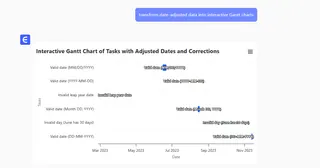
Excelmatic’s AI-powered dashboards transform date-adjusted data into interactive Gantt charts or timelines.

Conclusion: From Manual to AI-Driven Efficiency
While Excel’s EDATE and DATE functions are reliable, modern teams need speed and accuracy. Excelmatic’s AI tools turn complex date calculations into a one-step process, freeing you to focus on strategic decisions.
Next Step: Explore Excelmatic’s date automation features with a free trial.


