Key Takeaways:
- Manual data filling in Excel using the Fill Handle requires multiple steps and can lead to errors like incorrect ranges and formula references
- Excelmatic eliminates manual dragging and complex formula adjustments by allowing you to fill data using simple language commands
- Compared to traditional methods, Excelmatic handles complex sequences, date ranges, and formula fills with precise accuracy in a single instruction
- For business professionals in marketing, sales, and operations, Excelmatic transforms repetitive data entry into instant automated tasks, freeing up valuable time for analysis
In Excel, repetitive data entry can quickly become a tedious chore. For years, the Fill Handle—a small square at the bottom-right corner of a selected cell—has been the go-to tool for power users looking to save time. With a simple click and drag, it can copy values, extend sequences, and replicate formulas.
But what if there was an even faster, more intuitive way? This guide will not only walk you through mastering the traditional Fill Handle but also introduce a modern AI-powered alternative. We'll compare the classic manual method with the conversational approach of an AI agent like Excelmatic, helping you decide which tool is best for your workflow.
What Is the Fill Handle in Excel?
The Fill Handle in Excel is a small black square located in the bottom-right corner of the active cell or selected range. When you hover your cursor over this square, the pointer changes into a black plus sign (+), indicating that the Fill Handle is active and ready to be used.
This tool is the engine behind Excel’s AutoFill feature. It allows you to quickly populate adjacent cells by dragging the handle, which intelligently copies values, extends patterns, or adjusts formulas.
How to Use the Fill Handle
Using the Fill Handle is straightforward and can significantly cut down on manual work. Here’s the classic method:
- Select the cell or range containing the value, formula, or sequence you want to extend.
- Hover your mouse over the small black square at the bottom-right corner—the Fill Handle.
- When your cursor turns into a black plus sign (+), click and drag the handle down, up, left, or right.
- Release the mouse button. Excel will automatically fill the cells based on the detected pattern.
For a quick fill down a column, you can also double-click the Fill Handle. Excel will automatically extend the data to the last row of the adjacent column.
The AI-Powered Alternative: Using Excelmatic

While the Fill Handle is useful, it requires a series of manual clicks and drags. An AI agent like Excelmatic simplifies this process into a single instruction.
Instead of selecting and dragging, you just tell Excelmatic what you need in plain language.
- Upload your Excel file to Excelmatic.
- Type your request, such as: "Fill column A with numbers from 1 to 100."
- Excelmatic handles the entire operation instantly, without any manual dragging or risk of overshooting the range.
This conversational approach eliminates the need to find the small handle or remember specific options, making the process faster and more intuitive.
When to Use the Fill Handle
The Fill Handle is smart enough to detect and continue various patterns automatically. Let's see how it works in common scenarios and compare it to the AI method.
AutoFill Numbers
With the Fill Handle:
To create a sequence like 1, 2, 3..., enter 1 in cell A1 and 2 in cell A2. Select both cells, then drag the Fill Handle down. Excel recognizes the pattern and continues the sequence. This also works for other increments, like 10, 20, 30....
With Excelmatic: Simply state your goal. For the same task, your command would be:
In column A, create a sequence of numbers from 1 to 50.
Or for a different increment:
Fill column B with numbers starting from 10, incrementing by 10, for 20 rows.
AutoFill Dates
With the Fill Handle:
Enter a starting date, like 01/05/2025, in a cell. Drag the Fill Handle down, and Excel will automatically increment the date by one day.
With Excelmatic: Describe the date range you need. This is especially powerful for complex patterns.
Fill column C with dates starting from May 1, 2025 for the next 30 days.
Or even better:
List all business days for the month of May 2025 in column D.
AutoFill Weekdays
With the Fill Handle: Type "Monday" in a cell and drag the Fill Handle. Excel will automatically continue with "Tuesday," "Wednesday," and so on.
With Excelmatic: Again, just ask for it.
Fill column E with the days of the week, starting with Monday, and repeat for 4 weeks.
Understanding AutoFill Options
After using the Fill Handle, a small AutoFill Options icon appears. This menu lets you refine the fill action.
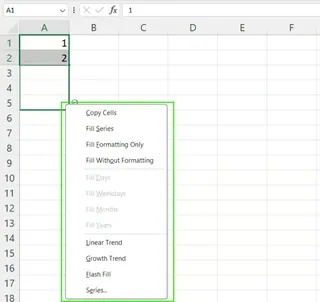
Common options include:
- Copy Cells: Duplicates the original value.
- Fill Series: Continues a detected sequence.
- Fill Formatting Only: Copies only the cell style.
- Fill Without Formatting: Copies only the data.
- Fill Weekdays/Months/Years (for dates): Fills based on specific time units.
With Excelmatic, these options are built into your natural language command. You don't need a post-action menu. For example:
"Copy the value in A1 down to A20"is equivalent to Copy Cells."Apply the format of cell B1 to the entire B column"is equivalent to Fill Formatting Only."List the first day of every month in 2025 in column F"is equivalent to Fill Months.
The AI interprets your intent directly, saving you the extra step of selecting an option.
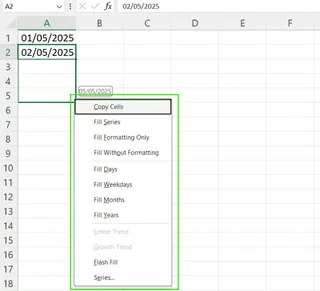
Excel Fill Handle Keyboard Shortcuts
For those who prefer keyboard-driven workflows, Excel provides shortcuts for filling cells:
- Ctrl + D: Fills the selected cell(s) with the content from the cell directly above.
- Ctrl + R: Fills the selected cell(s) with the content from the cell to the left.
- Home → Fill → Series: Opens a dialog box for more advanced series creation.
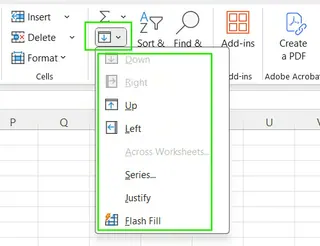
These shortcuts are fast but limited to simple copy-paste actions. For creating series or complex patterns, you still need the mouse or the Series dialog. In contrast, Excelmatic's single command line serves as a universal interface for all fill types, from simple copies to complex, logic-based fills.
When the Fill Handle Doesn’t Work
Occasionally, the Fill Handle might not appear or behave as expected. Here are the common culprits and their fixes.
How to Enable the Fill Handle
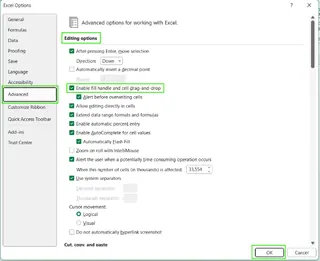
If the Fill Handle is missing, it's likely disabled in your settings. To re-enable it:
- Go to File → Options.
- Select the Advanced tab.
- Under Editing options, check the box for Enable fill handle and cell drag-and-drop.
- Click OK.
The AI Advantage: No Troubleshooting Needed
This is a key area where an AI agent like Excelmatic shines. You'll never have to dig through settings menus because the tool's functionality isn't tied to a specific UI element in Excel. If you can type your command, it will work. Issues like disabled handles or manual calculation modes become irrelevant.
Check Calculation Settings
If you drag a formula and the results don't update, your workbook might be set to Manual Calculation.
- Go to File → Options → Formulas.
- Under Calculation options, ensure Automatic is selected.
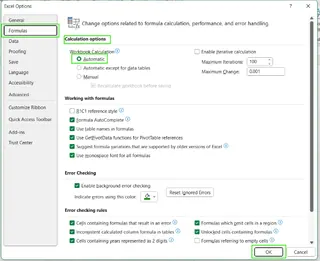
Again, Excelmatic bypasses this problem. It performs the calculation and fill operation on its servers and delivers the final, calculated result, regardless of your local Excel settings.
Advanced Tips and Tricks
Once you master the basics, you can use the Fill Handle for more complex tasks. Let's compare advanced techniques.
Using the Fill Handle with Formulas: When you drag a formula like
=A1+B1, Excel automatically adjusts the relative references (=A2+B2,=A3+B3, etc.).Fixing References with
$: To prevent a reference from changing, use absolute references ($A$1). For example, if you're calculating a commission based on a fixed rate in cellD1, your formula might be=C2*$D$1. Dragging this down will correctly changeC2but keepD1constant.
The Excelmatic Approach to Formulas: With AI, you describe the logic, and the AI handles the references.
In column D, multiply column C by the value in cell D1.
Excelmatic understands that
D1is a fixed value and automatically applies the absolute reference ($D$1) when generating the formulas. This eliminates one of the most common sources of formula errors in Excel.Leveraging Flash Fill: Flash Fill (Ctrl+E) is Excel's built-in pattern recognition tool. If you have full names in column A and start typing first names in column B, Flash Fill can detect the pattern and complete the list for you.
- The Excelmatic Approach to Data Cleaning: Flash Fill is powerful but limited to simple transformations. Excelmatic can handle far more complex data cleaning and transformation tasks with a simple command.
Extract the first name from column A into a new column named 'First Name'. In a new column, combine the 'First Name' and 'Last Name' columns, separated by a space. Clean the phone numbers in column G by removing all dashes and parentheses.
Common Mistakes and How to Avoid Them
The Fill Handle is fast, but it's also easy to make mistakes.
- Dragging Beyond the Needed Range: A slip of the mouse can overwrite important data. Fix: Press
Ctrl+Zimmediately. - Forgetting to Lock Cell References: This leads to incorrect formula calculations. Fix: Use
$for absolute references and double-check your results. - Unexpected Formatting: The Fill Handle can copy unwanted styles. Fix: Use the AutoFill Options menu and select Fill Without Formatting.
Excelmatic helps prevent these errors by design:
- Precise Range: You define the range in your command (e.g., "down to the last row of data"), preventing accidental overwrites.
- Intelligent Referencing: The AI automatically detects when a reference should be fixed, reducing formula errors.
- Controlled Formatting: The AI applies data without altering existing styles unless you specifically ask it to.
Conclusion
The Excel Fill Handle is a fundamental, time-saving feature that every user should know. It's excellent for quick, straightforward data series and formula copies.
However, as we've seen, modern AI tools like Excelmatic offer a more powerful, intuitive, and error-proof alternative. By letting you use simple language to describe your goal, the AI handles the complex mechanics of filling series, applying formulas with correct references, and transforming data—all without you needing to hunt for settings, remember shortcuts, or worry about manual errors.
For simple tasks, the Fill Handle remains a trusty friend. But for business professionals who value efficiency and accuracy, embracing Excelmatic's AI-powered workflow is the smartest way to work in Excel today.
Ready to transform your data entry workflow? Try Excelmatic now and experience the power of AI-driven data automation - no manual dragging, no complex formulas, just instant results.


