Key Takeaways
- Manual line breaks in Excel require remembering complex shortcuts and formatting steps that frustrate business users formatting addresses and reports
- Excelmatic's AI approach eliminates technical complexity - simply describe how you want text formatted and get perfectly formatted cells instantly
- The platform automatically handles wrap text and row height adjustments, avoiding the most common formatting mistakes that waste time
- For mailing labels, product descriptions, and formatted reports, Excelmatic provides the fastest way to create professional-looking multi-line text
Have you ever tried pressing Enter in an Excel cell, expecting a new line, only to have the cursor jump to the cell below instead? Unlike Word or Google Docs, Excel treats Enter as a way to move, not to break, lines.
But there are plenty of real-world situations where you do want multiple lines in a single cell: writing an address, stacking names, formatting labels, or just organizing long notes for clarity.
In this guide, I’ll walk through the simplest ways to insert a new line in an Excel cell. We'll cover manual shortcuts and powerful formulas. Plus, I'll introduce a modern AI-powered approach that automates the entire process, letting you skip the technical steps altogether.
How to Start a New Line in Excel Manually
Need to stack text inside a cell like an address, a label, or a multiline note? Excel lets you do that, but not the way you might expect. Pressing Enter usually jumps to the next cell. If you want to add a line break inside a cell, here’s how to do it on each platform.
Windows shortcut: Alt + Enter
On Windows, adding a line break is simple:
- Double-click the cell or press F2 to enter edit mode.
- Move your cursor to the desired location for the new line.
- Press Alt + Enter.
This inserts a line feed (ASCII character 10), which Excel interprets as a line break.
One important thing: Wrap Text must be enabled, or the line break won't show.
- Home tab → Alignment group → Wrap Text
Mac shortcut: control-based combos
On macOS, the shortcut varies slightly depending on your version of Excel. Try the following:
- Control + Option + Return – works on most versions
- Control + Command + Return – alternative shortcut
- Option + Return – supported on Excel 365 and later
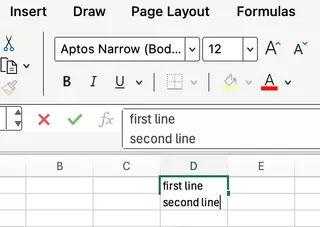
Just as on Windows, ensure you're editing within the cell, and that Wrap Text is enabled.
Excel online & mobile
Things get trickier on Excel Online and mobile versions. These platforms often don’t support keyboard shortcuts for line breaks. Here’s what you can do:
- On tablets or Chromebooks with keyboards, try Option + Enter or Alt + Enter.
- On iOS/Android, tap into the formula bar, then press Return if the keyboard shows it.
- If all else fails, copy a line break (e.g., from Notes or Word) and paste it into the Excel cell. Don’t forget to enable Wrap Text here as well.
Insert Line Breaks with Formulas
What if you have data in multiple cells and want to combine it into one cell, with each value on a new line? You can do that in Excel using formulas—no clicking or shortcuts, just pure formula magic.
Using CHAR(10) in a concatenated formula
The classic method uses CHAR(10), which represents a line break (line feed) in Excel.
Say you have a first name in A2 and a last name in B2, and you want them on separate lines in one cell. Try this:
=A2 & CHAR(10) & B2
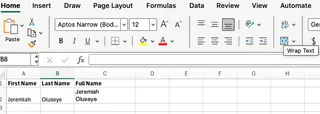
This stacks the values, with the first name on the first line and the last name below it.
Heads up again: You must enable Wrap Text on the cell for Excel to display the break. Home → Wrap Text. I highlighted the button in the screenshot above. You may also need to increase the row height manually.
Using TEXTJOIN()
If you’re using Excel 365 or Excel 2019+, you’ve got a slicker option: TEXTJOIN(). It’s made for cases like this—combining a range of values with a delimiter.
Here’s how you do a line break between values in A2:C2:
=TEXTJOIN(CHAR(10), TRUE, A2:C2)

- The first argument is the delimiter:
CHAR(10)(line break) - The second says to ignore empty cells (
TRUE) - The third is the range of cells you want to join.
And yes, you still need Wrap Text turned on for this to display correctly.
The AI-Powered Approach: Let Excelmatic Do the Work
While manual shortcuts and formulas are powerful, they require you to remember specific key combinations, function syntax, and formatting steps like "Wrap Text." There's a faster, more intuitive way: using an AI Excel Agent like Excelmatic.

Excelmatic understands plain language commands. Instead of building formulas, you just describe what you want.
Here’s how you would combine a first name (A2) and last name (B2) with a line break using Excelmatic:
- Upload your Excel file to Excelmatic.
- Type your request in the chat box, like:
In a new column, combine the first name from column A and the last name from column B. Put the last name on a new line.
- Excelmatic handles the rest. It generates the new column, inserts the
CHAR(10)formula, and automatically enables "Wrap Text" for you.
Traditional Methods vs. Excelmatic
| Feature | Manual/Formula Method | Excelmatic (AI Agent) |
|---|---|---|
| Speed | Slow for large datasets; requires manual repetition. | Instant, even for thousands of rows. |
| Ease of Use | Requires knowing shortcuts or formula syntax (CHAR, TEXTJOIN). |
As easy as writing a text message. No technical knowledge needed. |
| Error-Prone | High. Easy to forget Wrap Text or use the wrong syntax. |
Low. The AI handles all the technical details automatically. |
| Scalability | Good, but formulas can become complex. | Excellent. Handles complex multi-step requests with ease. |
Find and Replace with Line Breaks
Have a list of comma-separated values and want each item on its own line within the same cell? You don't have to rewrite anything manually. Find and Replace has your back.
Here’s how to do it:
- Select the cells you want to clean up.
- Press Ctrl+H to open the Find and Replace dialog.
- In the Find what box, type a comma (or whatever character you want to replace).
- In the Replace with box, press Ctrl + J. You won't see anything in the box, but trust that it's there.
- Click Replace All.
And just like that, your values will now stack into multiple lines inside each cell. This method is a lifesaver when cleaning up CSV dumps or reformatting long lists.
Practical Examples and Use Cases
Let’s see how these methods apply to real-world tasks.
Mailing Labels
You need to format mailing information inside a single cell for printing or exporting. Line breaks make it easy to stack the name, street, and city.
The Formula Way: If your data is in A2 (Name), B2 (Street), and C2 (City), use this formula:
=A2 & CHAR(10) & B2 & CHAR(10) & C2
This gives you:
John Smith
123 Maple Avenue
Lagos, NG
The AI Way (with Excelmatic): Simply ask:
Combine columns A, B, and C into a new column named 'Mailing Address'. Separate each part with a new line.
Stacking Full Names
Sometimes, you want two or more names displayed in the same cell but on separate lines for clarity.
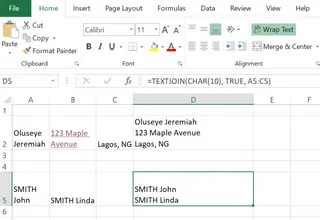
The Formula Way: If names are in A2 and B2, use:
=A2 & CHAR(10) & B2
The AI Way (with Excelmatic): Ask:
Combine the names from column A and column B into one cell, with each name on a separate line.
Combining Multiple Items as a List
Want to create a bulleted list inside a cell?
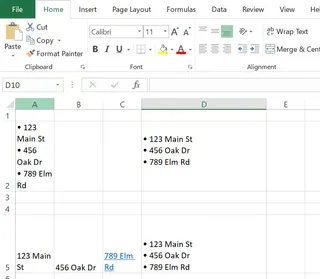
The Formula Way:
="• " & A2 & CHAR(10) & "• " & B2 & CHAR(10) & "• " & C2
The AI Way (with Excelmatic): Ask:
Create a new column that lists the items from columns A, B, and C. Each item should start with a bullet point and be on a new line.
Tips and Troubleshooting
Even with the right steps, you might run into issues. Here's what to check.
1. Make sure Wrap Text is On
This is the #1 reason line breaks don't appear. Excel won’t display them unless Wrap Text is enabled on the cell. Even if the break is present, it'll all appear as one continuous line.
- Fix: Go to Home → Wrap Text (in the Alignment group).
2. Adjust Column Width and Row Height
Line breaks don’t auto-resize your cell. If your text is still crammed, your row height is likely too small.
- Fix: Drag the row edge to expand its height, or double-click the bottom border of the row number to auto-fit.
3. Let AI Handle the Hassle
Tired of forgetting to enable Wrap Text or adjusting row heights? This is where an AI tool shines. Excelmatic automatically applies the necessary formatting, so your multiline text displays correctly the first time, every time. It eliminates the most common troubleshooting steps.
4. Mac Users Seeing Weird Results?
On macOS, Excel sometimes interprets line breaks differently. CHAR(10) usually works, but you may need to try CHAR(13) (carriage return) in some contexts. Also, shortcut keys can vary. If Control+Option+Return doesn’t work, try Option+Return or Control+Command+Return.
Key Points to Remember
Here’s a quick recap of what you’ve learned:
- Manual Shortcuts: Use Alt+Enter on Windows or Control+Option+Return on Mac for quick, single-cell edits.
- Formulas for Scale: Use
CHAR(10)with&orTEXTJOIN()to dynamically combine data from multiple cells. - Wrap Text is Essential: Without it, line breaks remain hidden. This is the most common mistake.
- AI for Simplicity and Speed: For the fastest, most error-free results, use an AI agent like Excelmatic. Just state your goal in plain language and let it handle the formulas and formatting.
Conclusion
Mastering line breaks in Excel is a fundamental skill for creating clean, readable spreadsheets. Whether you prefer a quick keyboard shortcut, a dynamic formula, or the efficiency of an AI assistant, you now have a full toolkit to format your text exactly as you need it.
While knowing the manual methods is useful for quick fixes, leveraging Excelmatic for repetitive or large-scale formatting tasks can save you significant time and frustration. It allows you to focus on the insights from your data, not the tedious process of preparing it.
Ready to simplify your Excel formatting? Try Excelmatic today and experience the power of AI-driven text formatting for your business documents and reports.


