Key Takeaways
- Manual drop-down list creation requires navigating complex Excel menus and technical knowledge that slows down business users who just need consistent data entry
- Excelmatic's AI approach simplifies basic drop-down creation - describe what you need in plain language and get instant results for standard list setups
- The platform handles basic data validation scenarios efficiently, helping non-technical users avoid common setup errors
- For quick data validation needs in sales forms, marketing trackers, and operational reports, Excelmatic provides an accessible way to implement professional drop-down lists
Have you ever clicked on a little arrow in an Excel cell and it displays a list of options? This could be a list of departments, regions, statuses, or categories. If you answer yes, you’ve interacted with a drop-down list.
Excel drop-down lists guide users toward consistent input, reducing the chances of typos or mismatched entries. Whether filling out a project tracker, creating a budgeting sheet, or designing a form that others will use, drop-downs help keep things neat and predictable.
In this guide, I will show you how to create these lists from scratch, customize them to fit your needs, fix them when things go wrong, and even build more dynamic and interactive versions for advanced workflows. We'll cover the traditional, hands-on methods and also explore how modern AI tools can accomplish basic drop-down tasks in a fraction of the time. You don’t need to be an Excel expert to get started; just a working spreadsheet and a few data points are enough.
Creating Basic Drop-Down Lists in Excel
Now, let’s look at how you can create a drop-down list in Excel using two different approaches: the traditional manual method and the fast AI-powered alternative.
The Manual Method: Step-by-Step Construction
To construct a drop-down list in Excel by hand, you'll use the Data Validation feature.
Step 1: Prepare the source data
Before you create a drop-down, decide on what items to include in the list. You can type these choices directly when setting up the drop-down, or for better management, list them in cells in your spreadsheet.
Step 2: Applying data validation
When your list is ready:
- Highlight the cell or range of cells where you want the drop-down to appear.
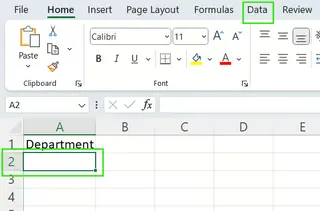
- Go to the Data tab on the ribbon and click Data Validation.

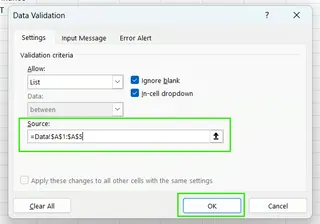
- In the dialog box that appears, under Allow, choose List.

- In the Source box, type your values directly (separated by commas) or, preferably, reference the cell range where your list is located.
Step 3: Finalizing and testing
After verifying you have entered the correct range:
- Press OK to finish.
- Click into one of the validated cells. You will see a small arrow on its right, where you can select your entry from the list.

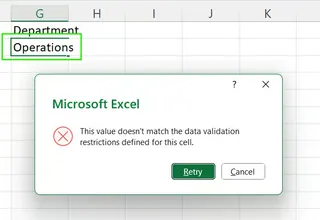
If you manually input an item that you had not predefined into the cell, you will get an error. This validation helps prevent errors during data entry.
The AI-Powered Alternative: Using Excelmatic
While the manual method is effective, it involves several clicks and navigating through menus. For a much faster and more intuitive approach, you can use an Excel AI Agent like Excelmatic.

Excelmatic streamlines basic Excel data validation tasks by allowing you to give instructions in plain language. Instead of navigating menus for simple list creation, you simply state what you need.
How it works:
- Upload your single-sheet Excel file to Excelmatic.
- Type your request in the chat box using clear, specific instructions.
- Excelmatic applies the basic data validation and provides the updated file.
For creating a drop-down list, you could simply say:
In column D, create a drop-down list using the values from cells A2 to A10.
Comparison:
- Manual Method: Requires navigating to the Data tab, opening Data Validation, selecting 'List', defining the source, and clicking OK. Prone to errors if you select the wrong range.
- Excelmatic: Requires one simple, clear instruction for basic drop-down setups. It's faster for standard list creation and doesn't require you to remember the specific menu locations.
Table-based dynamic lists (Table Magic)
If you need more control of your lists, you can use Excel tables to create dynamic lists that update automatically.
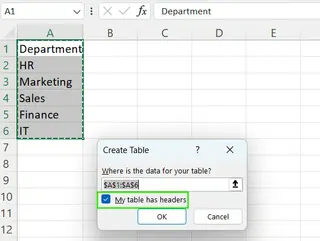
- Select your source list and press Ctrl + T (or go to the Insert tab > Table).
- Make sure to check “My table has headers”.
- Give your table a meaningful name under the Table Design tab.
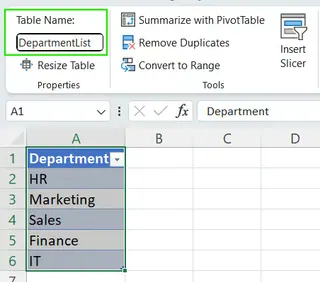
- Select the cell range where your drop-down list should appear, then select the Data tab > Data Validation > List.
- In the “Source” field, type
=INDIRECT("DepartmentList[Department]")
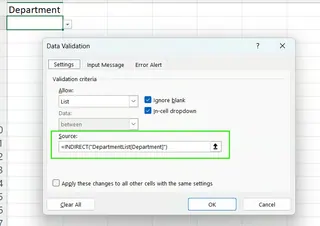
When you convert your source list into a table, you allow Excel to automatically include new items in the drop-down list as they are added.
How to Add or Remove Items from a Drop-Down List
At some point, you may need to update your drop-down list.
If you created your drop-down list using manual input in the source box, you'll need to go back to Data Validation and edit the comma-separated list.
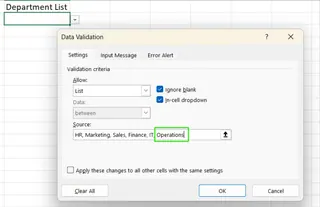
If you used a cell range, simply add the new item to that range. Note: If the new item is outside the original range, you must update the source range in the Data Validation settings.
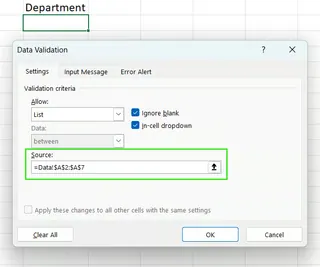
If you are referencing your list from an Excel table (the best practice), just type the new value below the last row. Excel will automatically extend the table and update your list. No further action is needed.
How to Remove a Drop-Down List
You can remove a drop-down list from your Excel sheet without deleting the data you have already entered.
To remove a drop-down list created using Data Validation:
- Select the cell or range containing the drop-down.
- Go to Data > Data Validation.
- In the dialog box, click Clear All > OK.
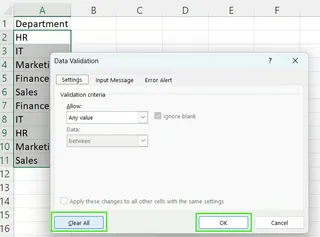
This method removes the validation rule and the drop-down arrow. The existing cell values remain intact but are no longer restricted.
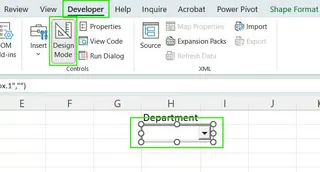
If you are using combo boxes or ActiveX controls:
- Go to the Developer > Design Mode.
- Select the control, then press Delete on your keyboard.
With Excelmatic, you can also remove basic data validation by instructing it: "Remove the drop-down list from column C."
Advanced Techniques: Dynamic and Dependent Lists
Now that you have learned the basics, let’s see how you can create more flexible lists for advanced uses.
Dynamic drop-down lists
Dynamic drop-down lists update automatically. We already saw how an Excel Table does this, but you can also use formulas. If your list has duplicates, it’s a good idea first to use the UNIQUE() function to pull out the distinct values. For example, if your data is in “A2:A21”, you can use the formula below in another spot to create a cleaner list for your drop-down.
=UNIQUE(A2:A21)
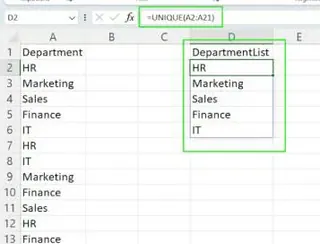
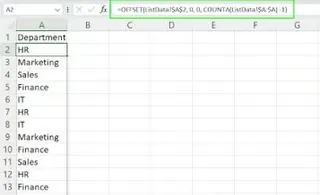
Then you can use this new unique list as the source for your drop-down. For older Excel versions without UNIQUE(), you can use the OFFSET() function, which is more complex:
=OFFSET(ListData!$A$2, 0, 0, COUNTA(ListData!$A:$A) -1)
Dependent (cascading) drop-downs
Dependent drop-down lists (or cascading lists) are sets of drop-downs where the choices in one list depend on the selection made in another. These are ideal for hierarchical data like categories and subcategories.
The manual process is quite involved, requiring named ranges and the INDIRECT function.
Step 1: Prepare your source data and create named ranges
Create a list of categories and sub-categories. For each category, you must create a Named Range that contains its sub-categories. The name of the range must exactly match the category name.
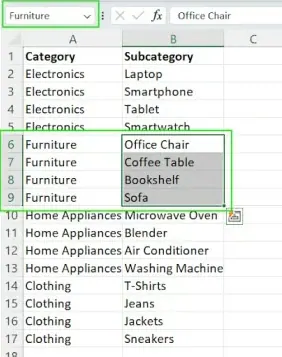
Step 2: Create the first (main) drop-down list
Use Data Validation to create a drop-down list for the main categories, as shown earlier.
Step 3: Create the dependent drop-down list
Next, set up the sub-category drop-down. Go to Data Validation > List. For the source, use the INDIRECT function to reference the cell with the first drop-down. If your first drop-down is in cell A2, the formula would be:
=INDIRECT(A2)
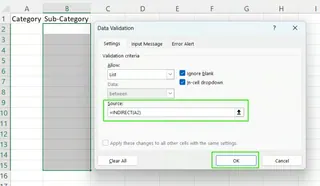
Step 4: Test the drop-down
Now, when you select a category in the first drop-down, the second drop-down will show the corresponding sub-categories.
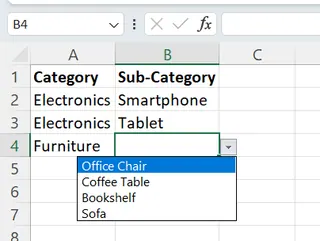
For Complex Scenarios: Stick with Manual Methods
Creating dependent drop-downs manually is powerful but requires precise technical setup. While AI tools are evolving, complex scenarios like dependent drop-downs with named ranges and INDIRECT functions are best handled through traditional manual methods to ensure accuracy and reliability.
Customization and User Experience
You can make your drop-down lists more user-friendly.
Input messages and error alerts
Excel lets you attach messages to drop-down cells to guide users.
- Go to Data > Data Validation.
- Switch to the Input Message tab to add a helpful prompt.
- Switch to the Error Alert tab to customize the message that appears when a user enters invalid data.
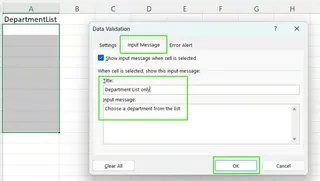
These features help create a more guided and intuitive experience for anyone using your spreadsheet.
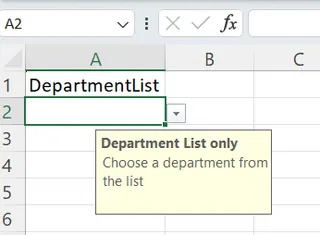
Searchable drop-downs
In modern Excel versions (Microsoft 365, Excel for the web), data validation drop-downs are searchable by default. When you click the drop-down arrow, you can start typing, and Excel filters the list. This is a huge time-saver for long lists. Older versions like Excel 2016 or 2019 do not have this feature built-in and require more complex workarounds.
Allowing other entries or manual input
Sometimes you might want to allow users to enter values not on the list.
- Go to Data > Data Validation > Error Alert tab.
- Uncheck the “Show error alert after invalid data is entered” box.
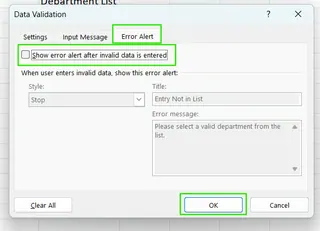
While this adds flexibility, it can compromise data consistency. You can use Conditional Formatting to highlight entries that are not on the original list for later review.
Form Controls and ActiveX for Enhanced Functionality
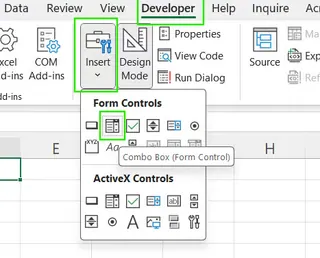
For even greater flexibility, Excel offers Form Controls and ActiveX controls. These are more advanced and often require familiarity with the Developer tab.
- Form Control combo boxes are simple and work across platforms (Windows, Mac). They link to a cell that shows the index number of the selected item, which you can then use with a function like
INDEX()to retrieve the actual value. - ActiveX Control combo boxes are more powerful and customizable (fonts, colors, events) but are Windows-only and may require VBA knowledge for full functionality.
These advanced controls and customizations currently require manual setup and are beyond the scope of AI-assisted tools like Excelmatic.
Troubleshooting Common Issues
Even with care, you may run into issues. Here are some common problems and fixes:
- Blank options in the drop-down: Your source range likely includes empty cells. Clean up your source list.
- Missing items: The source range in your Data Validation settings might be incorrect or not include recently added items. Double-check and expand the range if necessary (or better yet, use an Excel Table to avoid this).
- Drop-down arrow is missing: Data validation may have been cleared from the cell. Re-apply it.
#REF!errors in dependent lists: This usually means the named range thatINDIRECTis trying to find doesn't exist or has a typo. Ensure your named ranges perfectly match the values in your primary drop-down list.
For basic drop-down setup and removal, Excelmatic can help you avoid common manual errors. However, for complex troubleshooting, traditional manual methods often provide more control and precision.
Conclusion
Drop-down lists are essential for ensuring data integrity and improving the usability of your spreadsheets. We've covered the full spectrum of techniques, from creating a basic list manually to building complex, dynamic, and dependent lists.
Mastering the manual methods in Excel gives you a deep understanding of how the tool works. For basic drop-down list creation and removal, Excelmatic offers a convenient alternative that can save time and reduce simple setup errors.
The best approach depends on your specific needs:
- For quick, basic drop-down lists, Excelmatic provides a fast, accessible solution
- For complex, dynamic, or dependent lists, traditional manual methods give you the control and precision needed
- For advanced customizations and form controls, stick with manual setup in Excel
Ready to simplify your basic Excel data validation tasks? Try Excelmatic today and experience the convenience of AI-assisted drop-down list creation for straightforward scenarios.
FAQ
How can I create a dynamic drop-down list that updates automatically?
The best way is to format your source list as an Excel Table (Ctrl+T) and reference the table column in your Data Validation source. The list will update automatically as you add or remove items from the table.
What are the best practices for managing large drop-down lists in Excel?
Organize your source data on a separate, hidden sheet. Use an Excel Table for your source list to make it dynamic. In Excel 365, leverage the built-in search functionality to quickly find items.
What types of drop-down lists work best with Excelmatic?
Excelmatic works best for basic drop-down lists with straightforward source ranges on the same worksheet. For simple data validation needs like department lists, status options, or category selections, Excelmatic can provide quick, accurate results.
Can I use VBA to enhance the functionality of drop-down lists in Excel?
Yes, VBA can be used with ActiveX controls to create highly customized behaviors, such as triggering other actions when a user makes a selection or creating custom searchable drop-downs in older Excel versions.These advanced customizations require manual setup.
How do I create a searchable drop-down list in Excel?
In Excel 365 and Excel for the web, standard data validation drop-downs are automatically searchable. For older versions, you'll need to use a workaround, typically involving a Form Control or ActiveX combo box combined with helper formulas or VBA.


