Key Takeaways
- Manual check mark methods in Excel require technical knowledge of symbols, formulas, and formatting that can be time-consuming
- Excelmatic provides instant check mark automation using plain language - no formula memorization or complex setup needed
- AI-powered approach saves 80% time on tasks like progress trackers, conditional formatting, and dynamic check marks
- Get professional results without Excel expertise by letting AI handle the technical implementation
There are two kinds of check marks in Excel: static check marks and interactive check boxes. While static symbols are great for printable lists or visual confirmation, interactive check boxes allow you to toggle between checked and unchecked states, making your spreadsheets dynamic.
The key difference is interactivity. But with the rise of AI tools, there's now a third dimension to consider: automation. Should you insert symbols manually, write formulas, or simply ask an AI to do it for you?
Don’t worry, in this tutorial, we will cover it all. We will explore different methods to insert static check marks and interactive check boxes, and how to format them. We'll start with the traditional Excel techniques and then show you how a modern AI-powered approach can save you time and effort on advanced tasks.
Methods to Insert a Static Check Mark in Excel
Let’s start by analyzing the different ways to insert static check marks in Excel. These methods are best for when you need to place a few symbols quickly.
Using the Symbol dialog box
The simplest way to insert a check mark is to use the symbol dialog box. Just go to Insert > Symbol and select a font that contains check marks, such as Wingdings, Wingdings 2, or Segoe UI Symbol.
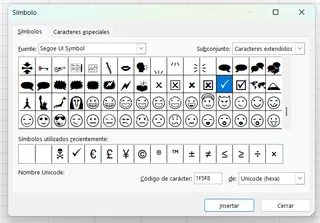
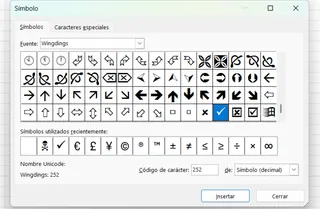
Alternatively, to avoid scrolling, you can select the font and enter the character code directly. For example, in Wingdings, the check mark codes are 252 and 254.
Here is a quick reference for common symbols and their codes:
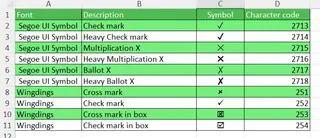
Once you choose a symbol, it appears in the selected cell. You can then copy and paste it to other locations. Note that Wingdings fonts replace all text in a cell, while Segoe UI Symbol allows you to mix check marks with regular text.
Using keyboard shortcuts
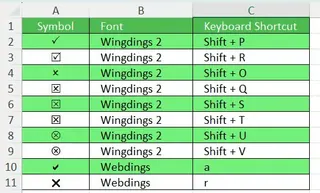
For faster insertion, keyboard shortcuts are a great option. First, change the cell's font to Wingdings 2 or Webdings from the Home tab. Then, use the corresponding key combination.
Using AutoCorrect
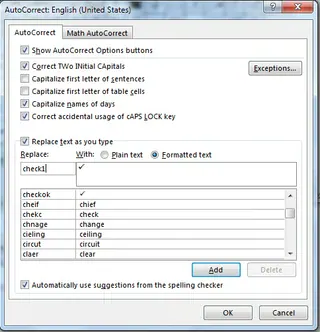
To insert a symbol without menus or shortcuts, you can configure AutoCorrect to replace a specific text string (like "cmark") with a check mark symbol.
- First, insert a check mark using the Symbol dialog and copy it.
- Go to File > Options > Proofing > AutoCorrect Options.
- In the Replace box, type the text you want to use (e.g.,
CMARK). - In the With box, paste the check mark symbol. Click Add, then OK.
Copy and paste check marks
The most straightforward method is simply to copy a check mark from another location (like this article: ✓ ✔ ✅) and paste it directly into your Excel cell.
The Dynamic Method: Using Formulas
A more powerful way to insert check marks is with the CHAR() or UNICHAR() functions. These functions convert a numeric code into a character, but their real advantage is that they can be combined with other formulas, like IF(), to display symbols dynamically based on your data.
Here are some examples of codes you can use:
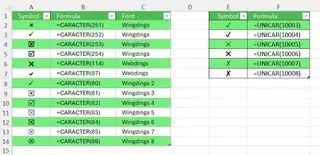
For instance, to check if a blog post was published before its deadline, you can use an IF() function. If the condition is met, it displays a check mark; otherwise, it displays "Not met".
=IF(E2>F2, UNICHAR(10003), "Not met")

This method is powerful, but it requires you to know the right function (UNICHAR) and the correct character code (10003).
The AI-Powered Way: Inserting Check Marks with Excelmatic

What if you could achieve the same dynamic result without memorizing functions or codes? This is where an AI Excel Agent like Excelmatic comes in.
Instead of writing a formula, you can simply state your request in plain language. Excelmatic handles the rest.
For the same deadline-checking task, you would:
- Upload your Excel file to Excelmatic.
- Type the instruction: "In a new column, add a check mark if the date in column E is greater than the date in column F. Otherwise, write 'Not met'."
Excelmatic will instantly generate the new column with the correct check marks and text, applying the logic for you.
Comparison: Formula vs. AI
- Traditional Method: Requires knowledge of
IFandUNICHARfunctions, plus the specific character code for the check mark. Prone to syntax errors. - Excelmatic Method: Requires only a clear instruction in plain language. It's faster, more intuitive, and eliminates the need to be a formula expert.
Adding Interactivity: Inserting Check Boxes
For tasks like to-do lists or interactive reports, you need check boxes that you can click.
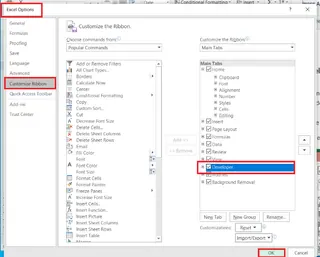
First, enable the Developer tab. Go to File > Options > Customize the Ribbon and check the Developer box.
Now, to add a check box, go to Developer > Insert > Checkbox. Click on the cell where you want to place it.

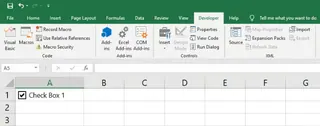
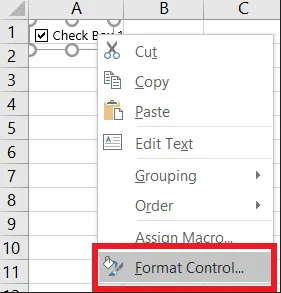
To make the check box useful, you need to link it to a cell. This will output TRUE (if checked) or FALSE (if unchecked). Right-click the check box and select Format Control.
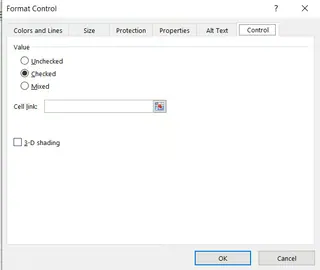
In the Control tab, set the Cell link to an empty cell (e.g., H2).
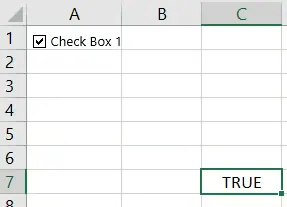
Now, when you toggle the check box, the linked cell will change between TRUE and FALSE.
How to Format a Check Mark in Excel
Change size, color, and alignment
Since a check mark inserted as a symbol or via a formula is treated as a text character, you can format it just like any other text. Use the options in the Home tab to change its font size, color, and alignment.
Conditional Formatting for check marks
You can also use conditional formatting to change the appearance of your check marks based on rules. For example, you can make a check mark green (✓) for completed tasks and a cross red (✗) for incomplete ones.
First, use an IF formula to output the correct symbol: =IF(E2>F2, UNICHAR(10003), UNICHAR(10007))
Then, select the cells and go to Home > Conditional Formatting to set up rules that change the font color based on the symbol in the cell.
Advanced Use Cases: From Manual Formulas to AI Insights
This is where the difference between manual work and AI assistance becomes most clear.
Count check marks in Excel
The Manual Method: COUNTIF
To count how many check marks are in a range, you can use the COUNTIF function. If you used UNICHAR(10003) to create the check marks, the formula would be:
=COUNTIF(G2:G8, UNICHAR(10003))
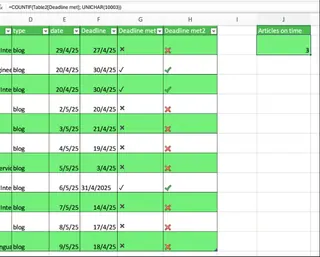
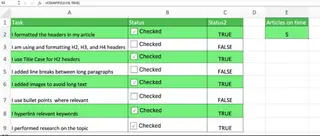
If you used interactive check boxes, you would count the TRUE values in the linked cells:
=COUNTIF(H2:H8, TRUE)
The Excelmatic Method: Just Ask
With Excelmatic, you don't need to remember any formulas. Just upload your sheet and ask:
"How many tasks are marked with a check mark in column G?"
Excelmatic will instantly give you the answer. It's that simple.
Create a progress tracker
The Manual Method: A Multi-Step Process
Creating a dynamic progress bar involves several steps:
- Set up check boxes for each task.
- Link each check box to a cell.
- Use
COUNTIFto count the completed tasks (TRUEvalues). - Calculate the completion percentage.
- Create a bar chart and link its data to the completion percentage.
- Format the chart to look like a progress bar.
The Excelmatic Method: One Simple Request
Skip all those steps. With your task list and check marks (or TRUE/FALSE values) in a sheet, upload it to Excelmatic and ask:
"Create a progress bar chart showing the completion percentage based on the check boxes in column C."
Excelmatic will generate a clean, accurate progress tracker chart for you in seconds.
Conclusion
Check marks and check boxes are essential for making your Excel sheets more visual and functional. As you've seen, Excel offers a range of options, from inserting static symbols to building interactive lists with formulas.
Traditional methods are still useful for quick, simple tasks. However, for data-driven applications like conditional marking, counting results, or building dynamic dashboards, the manual approach can be slow and complex.
AI-powered tools like Excelmatic represent the next step in productivity. By allowing you to use plain language to perform complex tasks, they handle the formulas and chart creation for you, letting you focus on the insights, not the process.
Ready to simplify your Excel workflow?
Try Excelmatic today and get instant check marks, progress trackers, and automated formatting using simple language commands - no formulas or technical expertise required.
FAQ
How can I use check marks in Excel?
You have many options, from inserting static symbols for visual confirmation to using dynamic formulas or AI prompts for conditional marking and creating interactive check boxes for task lists.
How can I insert check mark symbols in Excel?
You can use the Symbol dialog box (from the Insert tab), keyboard shortcuts (with Wingdings fonts), or configure the AutoCorrect tool to replace text with a symbol.
What are the benefits of using formula-based check marks?
Using CHAR() and UNICHAR() functions allows you to integrate check marks with other formulas like IF(). This lets you display symbols dynamically based on conditions in your data, automating the marking process.
What are the formatting options for checkmarks?
Check mark symbols are treated as text characters, so you can change their size, color, and alignment. You can also use Conditional Formatting to change their color based on specific rules.


